Monday, March 29, 2010

A Card for a Contest

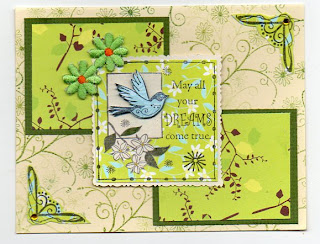
This is the first time I've ever made a card specifically for a contest... I've been lurking on the Rubberstampchat website for a few months now and they have a monthly contest sponsored by a different stamping company each time - often it says that you MUST use stamps by that particular company to enter, but this month it's open (although they have an extra prize for somebody who uses ALL Scrollworks stamps) so I gave it a go.
The theme of the contest is Spring and you had to use this sketch for your card.


I stuck pretty closely to the sketch, but since my central stamp already had a sentiment on it, I substituted a pair of embroidered flowers instead. The patterned paper comes from the Meadow's Edge collection, my background stamp and page corners are from Heidi Grace (I just LOVE those stamps - they're acrylic but they produce a nice clean stamp with coloured ink...) and my centerpiece stamp is from Inkadinkadoo.
I stamped the bird image three times - the base is on patterned paper, then I layered the picture onto cream glimmer paper and added a touch of deep green to the leaves, and lastly I stamped the bird onto a tiny scrap of blue paper from my stash and moulded it over a cut-up 3D gluedot so that it would be rounded instead of flat. The whole central panel is floating - I fastened it diagonally in the center and left the top and bottom corners loose so that it would have more dimension, only of course the scanner squished it flat.
Lastly I stamped the page corners with another Heidi Grace stamp and mounted them, and I added some teensy tiny yellow rhinestones for a touch of bling. Somehow the scanner makes the card look less cohesive than it does IRL... but never mind. I'm happy with it, and I'm sure whoever receives it will be too! Good luck to everyone else who entered the contest - this was my first attempt but it won't be my last. :)

And with some of the leftover scraps from working out that card (and some other stuff in my scrap basket) I made this one. I need to clear out my scrap basket tomorrow - it's full now!

Sunday, March 28, 2010

Catching up on 365 Cards

I went back and did the two days I missed out on...

Day 24 - 'Terrific Ten'. Use at least ten different patterned papers on your card. I used a large heart cut out of a catalog, inked a small border, and used ten different scraps of red paper to punch out hearts for a border. I decided it needed a little more, so I went back and glued a tiny pearl bead in between each heart.

Day 25 - Do It Yourself - make your own glittered brad or pearl. Okay, I cheated and used my failed card from yesterday's challenge for this. I'd made a fake bow with a brad in the center and I added glitter embossing powder to it (some got onto the bow too...)

Saturday, March 27, 2010

365 Cards Day 27 - I'm touched


This one was a lot harder than it sounds! Make a card using at least eight different elements, and each element has to be touching at least two others. My first thought was a bunch of flowers... I made this card and then I realised that while the bottom half of the card fit the requirements perfectly, the sentiment at the top wasn't touching anything! So I added some flowers... and then I had to add some leaves to meet the 'three' requirement because I put the flowers in the wrong place to fit. After that it was such a busy card that while it fit the challenge I decided to cut my losses (and the card) and to split it in twain.

I cut the decorated part off the card and placed it on its own base with a fake bow. And I attached some pretty paper to the top part to make it into a useable card too.

And then I made a fresh card for the challenge...

Friday, March 26, 2010

365 Cards Day 26

(I had to take a few days off crafting to rest my hands... I'll try to get back to Days 24/25 when I can.)

Today's challenge is to use a 'recipe' to make your card. You have to use the following elements AND NO EXTRAS:
  •  5x5 card
  • 3 circles
  • 2 squares
  • ribbon
  • sentiment of your choice
I never make square cards because they need special envelopes and take up too much room in the OWH mailing boxes, so this is a first. A friend lost her husband to brain cancer last weekend, so I decided to make her the card nobody ever wants to have to make... my challenge was to follow the recipe and to make a card as beautiful as I could in tribute to Rob.
The recipe said you had to use ribbon but it didn't say what you had to do with it, so I tried my hand at ribbon embroidery. I've never done this before but I found a tutorial on basic ribbon embroidery stitches which makes it all very simple, and it really wasn't as hard as it looks. I used the narrowest ribbon for the flowers and a wider one for the leaves because I didn't have the right colour green in the skinny one. The wider ribbon looks good but it was MUCH harder to get it through the cardstock. If you want to try this, use a tiny hole punch to make the holes in the center of the flowers (I used my cropodile) and make sure you're using sturdy cardstock because it's going to get pretty beat-up before you're finished.

Thursday, March 25, 2010

DH has a blog

Want to see a bit more of our daily life? DH has decided that he wants to get into this blog thing... and not being a crafter, he's writing about our cats and his techy stuff. And he uses photos. There's even a couple of me in there. :P Click the link to go see what he's been up to.

Tails Of... 

PS. No new cards today... my wrists are complaining vigorously that I've been overdoing the fine motor activity and I have to give them a rest so I don't have a real issue with them. I took yesterday off computing entirely and went shopping instead! I've packaged up my mother's day cards to send off to OWH and also packaged a couple of swaps, and that's it for my crafting activity for a few days.

Tuesday, March 23, 2010

365 Cards Day 22/23

Yesterday's challenge was to make a card inspired by Alice in Wonderland. I've actively avoided any version of it other than the Disney cartoon of my childhood, so I have no clue about the new movie and no interest either. I found some really sweet Alice in Wonderland clipart online at Disneyclips.com and I made an abortive effort to paper-piece a sleeping Alice... alas it was a total disaster and I had to trash it.  My cutting skills just weren't up to the job of aligning the edges and Alice came out looking like a giant mutant space alien! (no I didn't scan/photograph my disaster... use your imagination! But you'd be better off just using the clip on the left. I still think it would make a lovely card - I'm just not clever enough to pull it off, and I'm out of coloured ink for the printer...)
Time for something simpler... I had some cute teacup stickers a friend gave me - there was a tea party in Alice in Wonderland. How about a simple girly tea-party card? The sticker was too elaborate to be a small part of another card, but not quite large enough to carry the design by itself, so I made a punched border and stamped a little edge.   The white layer is on the front of the card and the pink is the back. It needed a little more 'bling' so I used some pink plastic jewels on the border and I'm very happy with it.
Today's challenge was more up my alley - make a card using a stencil. I don't use them often but I've got  ton of stencils!  I dragged out a birthday stencil and made myself a card. I added a sentiment from my stamped image box... and it needed a little something extra. I dug around in my embellishment box and found a tassle I made for a Christmas card and didn't use, and I hung it off a star brad.

Sunday, March 21, 2010

A 365 Cards Weekend

I'm quite proud of myself - I devoted most of my time this weekend to the Operation Write Home Bloghop, and I still managed to get my 365 cards done as well. I've made every card so far, and for the last two weeks I've been ON TIME!

Day 21 was to make a 'Noisy Card'... I don't have any little bells handy so the easiest way to do this one was to make a shaker box. I'm not very good at them and I really don't like the way this card came out - I wanted the nice metallic sparkly sequins to stand out so I made the background fairly dark and plain... it looks a bit better IRL because you can see the shine. But the sparklies in the shaker keep glueing themselves to the sides of the box instead of shaking around, and it's definitely not one of my greatest successes.

Day 22 is Super Sketchy Sunday. I love flowers, so this week's sketch was a natural for me, and I tried to make my card as close to the design as I could. I had a nice yellow card background recycled from a greeting card, and I made nice big punchy flowers to go on it. It took forever to make the 'sideways' flower! I've never done one before so I was making it up as I went along. I all the petals out and glued them into shape so it would look like the flower was partway open.
The other tricky part of this card was the ribbon. I wanted to use that pretty woven ribbon and to make a knot or bow in it, but the ribbon is one-sided and it just looked silly! I fiddled around a bit and made a decoration that showed the top of the ribbon on both sides and glued it onto the card. I was going to put a small sentiment up at the top of the card but I decided that it really didn't need it. A few poppy leaves were enough, and I drew the flower stems in with a marker.

Taking up the Gauntlet - Challenges from the OWH Bloghop

* Cards will be added to this entry as I get them made.

My first challenge came from Fabre - she challenged us to find something in our stash that was old and unloved, or maybe even about to be discarded, and to find a use for it. This beautiful blue and purple feather embellishment fit that category nicely. It's so pretty I could never bring myself to get rid of it, but I never found the right use for it either! I had to trim the blue feather down to make it fit on the card, but now it's ready to be loved by someone far away...

  • Cr8ive Me challenged us to use chipboard on a card...
  • Brenda Rose challenged us to make a card using her sketch featuring circles. 
  • Joscie made a really cute card with flags that I want to scraplift.
  • The Bucketlist Stamper showed us how to make a die-cut card with a quilt design that I would like to adapt for my own cutting tools.
  • Meljen kindly shared a gorgeous printable bunny for our cards, and I saved the artwork for future use.
  • Stretch N Bubbles gave us a free digital bee for us to download for our cards...
  • Paula donated lovely downloadable digital stamps for making a 'miss ewe' card and a springy tulip...
  • Brittany challenged us to make a card using blue, cream, or white paper (patterned or solid), brown or red stamping ink, and some sort of decorative detailing.
  •  Kelli shared some lovely Clean and Simple cards that just beg to be scraplifted and used for inspiration...
  • Megan Bean shared some lovely scrapliftable springy cards and challenged us to make a Spring card for OWH.
  • Jan shared some shaped bird cards that are too cute to fly by without noting them...
  • More than Memories blog features the most magnificent chalked flower cards, and I just had to mark them to make sure that everyone goes back for a second round of drooling over them!
  • Polley Crafts has a lovely simple card that I would love to scraplift...
And I made it to the end of the Bloghop! It took me all day yesterday to get through the first half, taking a few breaks for creating cards inspired by what I was seeing... and then I had to go back to the beginning all over again to note down the challenges that I forgot to record the first time! I hope you've been as inspired by everyone's hard work and generosity as I have... remember, I posted a small challenge in my bloghop entry and it's still open. Make a card using your cropodile - and if you don't have a cropodile then you can use any small hand-held circle punch instead. Post a link to your card in my blog (sorry, I was going to use Mister Linky but you have to edit your blog code to make it show up and I'm an ignoramus in that area!) and I'd love to send you a reward!

    Saturday, March 20, 2010

    More Scraplifted cards from the OWH Bloghop

    If you're looking for my actual bloghop entry, please keep going down the page. I've made a few entries of scraplifted cards this afternoon, inspired by cards others have posted. I loved the elegant simplicity of this design by Stephanie... alas I didn't have the right stamps to duplicate it, so my version is more an 'inspired by' than a scraplift.
    I stamped the treetrunk with the side of my acrylic block... it didn't pick the ink up evenly but I kind of like the effect. I stamped the leaves with an old leaf stamp... the big blocky 'tree' needed nice big flowers to set it off so I used two different sized flower punches with shimmery pink paper and finished the flowers with gold brads.

    The only part of this second card that was stamped is the tree-trunk. I used a diamond border and just kept stamping until I had something vaguely tree-shaped. I used punched leaves and to make the flowers more three-dimensional I folded up the petals before I glued them down, and I put little pink sparklies in the center.

    Scraplifted cards

    I'm getting lots of inspiration from the Operation Write Home Spring bloghop! Here's a card I've scraplifted already... I just loved Kate's circle-punch flower and delicate floral background.

    I've been looking for ways to use my circle punch, so it was just right for me to try. Only I liked the look of the flower with six petals rather than five, and I used my 'tree' punch to make the greenery. And lastly, I used a super-giant rhinestone for the center of the flower...it's made the card come out rather dark and shadowy on the scan, but it's really a nice cheery orange. Orange isn't a colour I use often... but I'm very happy with this card.

    More cards coming shortly! I've got to run to the store now...

    Here's another scraplift for you. This one was created by Debi Rice, for her blog on cardmaking on a budget. It appealed to me as a great way to use up teensy tiny scraps of brightly coloured paper... plus I had some cute vase/planter punchies in my stash from a RAK years ago! I think Debi's card is nicer than my copy - take a look at it and see what you think!

    (No, I didn't use my cropodile to punch the flowers... but I could have! lol If somebody wanted an idea for my challenge, this would work beautifully.)

    We wanna We wanna We wanna hop!

    I'm waiting impatiently for the OWH Spring break bloghop to officially begin - it's 7am in Florida and I'm ready to start checking everyone out! But it's still the middle of the night in Washington state... I'll just pace the floor for another few hours and wait for Sandy to wake up. :)

    If you're looking for my Spring Break Bloghop post, go down one entry - I posted my tutorial and a challenge last night before I went to bed so they'd be ready for you first thing this morning.

    And if you want to start hopping, the first blog hop entry will be here - Stars and Stamps. At least it will once somebody wakes up to post it!

    In the meantime I'm going to consider the 365 cards challenge for today - to make a noisy card. Hmmmm... shaker boxes are not really my forte, I might try to go with dangly metal charms instead.
    I've been following along with 365 cards since the start of the month and I love getting a new challenge every day! It's stretching my imagination and helping to enhance my card supply so I'll have more cards to send in to OWH.

    EDIT - the bloghop has been officially opened! Let's have some fun! 

    Friday, March 19, 2010

    Let's get Hopping!

    Hi everyone! It's Bloghop time! I hope you're ready for a busy day... I've seen some of the entries already and they're wonderful! If you've been following along with the hop you should have come here from Nancy's blog... if you didn't, you can find the start of the hop on the Stars and Stamps blog: http://www.owhstarsandstamps.org - there's a full list of hopping blogs there in case you get lost. As you probably know, Operation Write Home collects handmade greeting cards and notes of encouragement to send to the folks who are serving in the military overseas. I love making cards and sending them in whenever I can - anywhere from 30-250 cards in a batch depending on how much time I've had to make them lately. Did you know that you can squeeze a full 100 A2 cards into a flat-rate priority envelope if you pack them into stacks of 25 and wrap a sheet of plain paper around each pile? And it's only five bucks to mail the envelope? That's a bargain in anyone's book! But even if you can only send in one or two cards, it will make a difference to somebody's life, and that makes it well worth it. The only hard-and-fast rule is no glitter - it's a safety hazard to the troops because it could shimmer in a pair of night-vision goggles! If you want to use store-bought glittered items on your card, give them a good hard rub with your fingers first - some glittered papers could go through a hurricane without flaking, but others are totally unsuitable. If even one speck of glitter comes off on your hands, save that item for your own stash and use something else instead. Glitter that's embedded in acrylic or 100% sealed into plastic is perfectly safe, but even one particle of loose and flaky glimmer is too much for safety.

    Now on to my entry-proper...
    I was scratching my head about what technique to share with you today... and I decided to share my new toy - my cropodile. I'm sure everyone knows what a cropodile does - it punches holes and mounts eyelets with the squeeze of a lever so you don't have to bang and thump and disturb the neighbours when you're making cards at midnight... they've been on the market for the best part of a decade, but I preferred brads, which don't need any kind of special tools to set. Then I saw a pink cropodile on sale and thought 'what the heck'... I was immediately impressed, not just by how easy it was to set an eyelet into my card, but by how much else I could think of to do with it.
    The cropodile has not one sized hole punch incorporated into it but three.  The eyelet-mounting end has a little poky prong to hold the eyelet in place, and if you put a sheet of paper in there, it'll make an extra-small hole for you. If the paper doesn't pierce all the way through, poke it to the back with a needle...
    The only snag with the hand-held cropodile is the depth of the tool is very limited - you can only poke holes near the edges of your card and not in the center or along the inside fold. Which is why they also made a larger table-top version with a full 12-inch reach (one of these days I'll have to get one of them!)

    So what to do with all of these holes? Here are just a few ideas for you...
    • if you'd like to put a bow on your card, you can poke two holes close together on the card and thread the ribbon through...
    • turn a punchie or a handcut cardstock shape into a homemade 'button' in moments (to make it look really flash, coat the finished button in UTEE and give it a raised, shiny finish.)
    • combine one or more of the hole sizes with other small decorative punches to make a border.
    • Make a corner decoration on your card with embroidery thread or wool - punch small holes and thread the yarn through. You could also make a cross-stitch border, or other threaded decoration on a strip of cardstock.
    • A row of holes can become a laced decoration. Or else punch holes at either end of the card and thread the ribbon through instead of wrapping it right around the card or leaving loose ends. 
    • Punch a border just with holes! I used all the different-sized holes on the threaded strip so you could get an idea of how they'd work...
    Here's a card I made using my cropodile to punch various holes... I used the largest hole for the threaded ribbon, the middle-sized hole for the border, and the smallest hole to make button-holes in my cardstock buttons.
    And now for your challenge - make a card or other paper item using your cropodile for something other than just setting eyelets! If you don't have a cropodile, use whatever size small round hole punch you do have. I'm not going to be using a ruler to measure the size of the holes. :P Make one hole, make a dozen... do whatever you like. Leave a link to your completed card in your comment, and somebody will get a prize!

    I hope you'll come back and leave me a note if you attempt this challenge... in the meantime, on to the next blog in the hop - Scrappily Ever After. Lainie has a very moving story to share, and a personal challenge we all can help with.

    Tomorrow is the Operation Write Home Spring Bloghop!

     
    Don't forget to join us and start hopping... 80+ blogs have signed up and there are lots of challenges, inspirations, and blog candy waiting to be given away over the weekend! So come along and hop along...

    And now to get you in the mood...
    Today's challenge on 365 cards was to make a card inspired by Cotton. A lot of people are doing pure white formal wedding cards for this challenge... but when I think of cotton the first thing that springs to mind is puffy white cotton wool springtime clouds... and the next is Peter Cotton-tail himself. So I made two nice springy cards to reflect this! The first uses a pre-printed cardbase, a hand-drawn sentimet, and my 'love bunny' stamp from Inkadinkadoo with a cotton wool tail. The second is paper-pieced using hand-torn and punched papers (the clouds are some handmade paper a friend gave me...) and a little Stampin' up stamp to complete the card. 

    Have a nice springy day everyone, and I hope we'll see you hopping tomorrow!

    Thursday, March 18, 2010

    Yet another entry for today - Stars and Stamps Challenges

    This weeks' challenges on Stars and Stamps are very simple... Sunday's sketch is simply two triangles with a circle or oval in the center of the card... I didn't want to mess with it, so I kept my card VERY simple too. It needed a little more 'bling' so I finished it off with a gold lace that was RAKed to me.

    Wednesday's Challenge is to use some of your stash of flowers... this card is a bit more complex, but that's because I made the card-base when I was trying to figure out how to do LAST week's challenge and set it aside to finish later... the flowers are stamped on the card, one of them is stamped seperately and only glued down the stem, and I made a border using the pointy end of a couple of very light-coloured memento teardrop ink pads. I rubbed the same ink onto my sentiment, and added a layered flower to finish it off.

    And here's another bright and cheerful floral card to use up a few of my stashed silk flowers... 

    365 Cards Day 18 - plentiful patterns

    Now this challenge took a little thought - and a LOT of digging. They asked you to choose at least three of the following patterns to use in your card:
    • houndstooth
    • gingham
    • plaid
    • paisley
    • toile
    I wasn't entirely sure what each of those patterns actually WERE so I had to look them up on google to make sure I knew. In case you're not entirely sure either, here's an explanatory link complete with pictures - What's the difference between the checks. In short, gingham is a simple coloured/white woven-style check. Plaid is another woven check but it's more elaborate and often involves more colours. Paisley is the 'fish-shaped' design based on Indian art. Houndstooth is the funny 'stretched' check that comes in one or more colours at a time. And toile is an elaborate repeating design (usually white) of scenery, flowers, milkmaids etc. printed on a plain coloured background.
    Now that's straightened out, on to the next step - digging around in my papers to find suitable 'sets' to use! I started pulling sheet and trying to co-ordinate them, and I came up with a couple of different colour families - green, blue, yellow, pinky, and brown. I didn't have perfect matches for some of the options, and I could only find two houndstooth papers (I don't really like that design)... but there were a lot more in general than I would have expected and I had plenty to play with!
    And here are my cards... I photographed them all together and numbered them for the purposes of explanation. (click on the photo to see a larger version of the cards...)

    #1 uses papers from the Joanns 'Spring' stack. The center piece is from a mini-mat-stack, and while it's not strictly toile, it IS an elaborate repeating white design... I finished it with a diecut tag, a sticker, some tiny buttons, and a flower made from a tutorial somebody shared a few weeks ago. It's really easy - punch out four identical flower shapes and fold them in half, Then interlock them like you were closing the flaps of a cardboard box and glue them onto a round base. Fluff up the petals and you have a flower that reminds me of either a water lily or a chrysanthemum or a carnation depending on how fluffy you make it!

    #2 is made with a pre-printed base from My Mind's eye. I added a wide strip of houndstooth and plaid... and since toile is such an elaborate pattern and I didn't want it to fight with the paisley,  I punched out some small  flowers and used them to frame the sentiment like a medallion.

    Cards #3 and #4 were made exactly the same way. I cut simple strips of each paper and lined them up on the card, one with a straight edge and one with an overlapping zigzag. The background doesn't need any extra decoration, so I added a sentiment and those cards were done.

    Lastly, card #5 showcases an elaborate (but very beautiful) floral paisley from Basic Grey. I just adore this paper and never want to cover any of it up! So I matted it diagonally with a little houndstooth and laid it on top of a simple plaid background and the card was done.

    365 Cards Day 17 - Twinchies

    Just a very quick card for this one... I used a Twinchie/Deco square I received in a swap, and a pre-printed cardbase from My Mind's Eye. I trimmed one edge of the card so you can see the coloured interior, and added a stamped sentiment from another swap. The Twinchie had a couple of glue marks on it from rubbing up against another piece so I covered them with brads, and the card was done!

    Tuesday, March 16, 2010

    Catching up on 365 Cards

    There was a very noisy festival just opposite our house over the weekend, so we spent a lot of time out and about to get away from the noise... so I never got Sunday's challenge done till this morning! So here are three day's worth of cards for you instead of one!

    Day 14 - Super Sketchy Sunday.
    Use this sketch to make your card...
    Which became this card very quickly, because I had a card base in my stash which fitted the basic shape! All I had to do was embellish it, and to figure out a way to incorporate the folded ribbon. I didn't feel like messing around with real ribbon today, so stamped it on some cardstock and folded the end.

    Day 15 - Ad-inspired. The obvious thing to do with this ad is to make an Easter card... but the Easter deadline for Operation Write Home was two weeks ago! I'm done with Easter cards for the year already. So I decided to go with a spring theme and to use the beautifully delicate blue flowers as my inspiration and to play with my new 'Stretch Your Imagination' Cricut cartridge.

    This cartridge was designed for making cards so it has shaped and matching frames sized to fit... but of course I mixed-and-matched to get the effect I want. I cut a 5-inch-tall square frame with scallops top-and-bottom and trimmed the outside edges off, then I used the strips to make an extra decorative feature. The center of the frame was flipped and glued back in to place, and I put the Easter basket and a bunch of silk flowers in the basket. BTW these were the ONLY light blue flowers I have, and they were just right for this... it needed a little something more, so I stamped a Studio G stamp across the base of the basket and set it aside for the glue to dry.

    And lastly for today, Day 16 - Opposites Attract. (Use two opposing images  on your card eg. cat and dog, sun and moon...) I started with a 'sunny' and 'rainy background paper in the same colour family... I was going to use a single weather stamp with the sun peeping out behind the clouds...but I didn't like the way the sun came out when I embossed it, so I decided to just use the cloud. I stamped a bunch more on light blue cardstock, coloured them with markers, used a blending pen to try to make them look a bit more cloudy and embossed them with UTEE. Then I drew raindrops on the card and embossed them. And for the Sunny side I mounted a sticker on popdots and stamped a few butterflies between the printed flowers.

    Saturday, March 13, 2010

    Doing the polka, Dot... (365 Cards, days 12 and 13)

    I had FUN with Day 12 - Circle Frenzy... you had to use at least 20 circles from at least two different sources. Think I got it covered? I was quite pleased with myself for managing to incorporate five different 'dotty' papers into my first card! One tip if you want to scraplist this design - start from the MIDDLE of the card. I lay down the papers starting from the outside edges and making them mirror-image each other... and it worked great until I had to try to cut a triangle exactly the right size for the middle of the card! The tips are all messy and misaligned so I covered them with the sentiment block.
    My second card was a five-minute job to use up some of the scraps from cutting all the triangles of paper for the first card... I glued them down randomly, and stamped some rows of circles with a border stamp.
     The third card uses even more of the scraps, only this time I punched them into circles myself using a 1-inch punch and a regular hole puncher and scattered them randomly around the card.

    Day 13 was a real challenge, and it took four attempts to make my card come out the way that I wanted it to. The challenge is to use a paper-pieced and/or stamped image and to make it three dimensional by raising PART of the image, but not the whole thing. I started with a simple flower stem, (one flower, two large leaves and a bunch of tiny hearts) and I knew that I wanted to raise the flowers and leaves in some way, but it took me a few tries to figure it out. Stamping the whole image didn't work because the leaves are solid rubber, so I coloured the stamp with markers and stamped each part of the image seperately. The stems and tiny leaves went down on the card itself, then I stamped the flowers onto blue paper, and coloured the leaves in with two different markers to texture them a little. The big leaves are only glued in the center, and the flowers are half on popdots and half glued at the base with the petals folded up.

    Stars and Stamps Technique Challenge Paper-piecing

    This week's Wednesday challenge was to paper-piece a stamped image... it's not something I've ever done before, but I thought this little turtle would look really cute in green. I stamped two different greens and made mirror-image cards. It was  lot less fiddly than I thought it might be because you don't have to cut out ALL the tiny pieces, just the ones you want to use.

    Alas I can't upload the pictures just yet - DH is in the middle of updating my computer and I don't have any image-manipulation software installed yet! (I like Irfanview for simple image-cropping and resizing, and it's FREE!) So I'll post this entry as a place-holder and add the photos asap.

    And here are my scans! I mounted the first turtle on one of my scrap strip backgrounds... the second was assembled straight on the page, inked up a bit, and it needed something more so I added punchy bushes.

    Thursday, March 11, 2010

    365 Cards Day 10 and 11

    Yesterday's 'Wacky Colours' challenge was such a doozie that I had to wait to see how everyone else tackled it before I tried it myself. Orange, blue and purple is NOT a colour combination that it would ever occur to me to use together! I found a small piece of floral cardstock in those colours and added some vivid primaries. It had a dragon punched out of one side so that decided the main decoration. I stuck a piece of vivid orange behind the opening for my dragon. The card needed a little 'bling' to help seperate the layers, so I added some tiny scrap dots (from the inside of foil stickers) and I gave the dragon golden claws. It was fiddly getting those tiny little pieces into place, but I think they bring it to life... btw those two dark scalloped layers that look almost identical are actually purple and deep blue.

    Today's challenge was much simpler - make a landscape/scenic card using patterned paper as the background. I love doing collages but I usually use cardstock, so using patterned paper instead took a little digging around... I'm very happy with how it came out.

    Tuesday, March 9, 2010

    The OWH Spring Break Bloghop is coming!

     
    It's time for the annual Operation Write Home Spring Bloghop. I'll be making a special blog entry for the hop and offering up a tutorial/challenge - there are 75 bloggers signed up already. Will you join us? Sign your blog up here. 

    While we're on the subject of OWH their current challenge is the Half and Half Challenge - send in half Mother's/Father's Day cards and half general cards... but they have to be in the hands of the shippers by March 15th, so time is short! I mailed in a small package last week and I'm working on a second today because if I do my maths right it has to go out in the mail tomorrow to make sure it gets there on time! 

    And now on to the next Stars and Stamps Sketch Challenge. 

    This design isn't new to me... in fact I submitted my own version that was almost identical just last week, but Erika got in first! When I have scraps and oddments of cardstock or paper left over, I'll trim them into even-width strips and use them to make a card base, arranged either horizontally, vertically or diagonally according to their length. The main difference between my version and Erikas is that I run the strips all the way across the card and trim them off at the edge - that way I don't have to try to line them up evenly at the ends! 
    Erika incorporated a border, so I cheated. I cut myself a rectangle of coloured cardstock the right size to have a border around it and lined three strips up it, then I glued THAT onto the card base. The visual effect is the same, it was just easier to line up! The paper strips were long enough to do a horizontal card as well as a vertical one, so I made them both at the same time - I just left the end strips wider for the second card.
     
    Here's another variation I did on the sketch... This one actually only uses two strips of paper - I cut the border on the middle piece and mounted it, then trimmed it at the appropriate width and glued it onto the card base. I finished it with sticker lettering and some cute little hearts.