

Showing posts with label Stars and Stamps. Show all posts
Showing posts with label Stars and Stamps. Show all posts
Tuesday, March 15, 2011
'Going Dotty'
Stars and Stamps midweek challenge last week was to use polka-dots on your card. Here's one I did for the challenge... the mat is actually metallic pink lips so it's got a bit more zing to it than it looks like here.

Friday, March 4, 2011
Graphics by Fran, card by printer...
There's a very special post on the Stars and Stamps blog today - beautiful art cards by a very special lady. Fran doesn't use stamps or clipart or patterned papers - she draws and colours every one of her cards by hand, and they're amazing! And because she's so special, she gave us some digital art to play with, as long as we're using it for OWH. There are four different clips, so if you don't like the fishy, there are plenty of other choices.
 Anyone who's read my blog knows I'm not fond of colouring. Sandy's examples are totally awesome, but I couldn't possibly do justice to Fran's designs if I tried to colour them in myself (you really don't want to see what I did to the poor fishy I tried to draw scales on by hand...) Luckily I don't have to try. I cheated! lol There's another solution that works really well for simple designs with fairly large pieces - I paper-pieced them! NOTE - paper-piecing wouldn't work well on Fran's other images because they're too detailed and you'd go barmy trying to cut and reassemble all those fiddly little bits, so I chose the fishy by default. Besides, he's CUTE!
 So how do you do paper-piece a piece of clipart? Easy peasy! I printed the art out on four different coloured sheets of paper, and then I cut out the bits I wanted and assembled them on top of the blue background. I had to cut the yellow fish right out of the sheet to get the fins and lips, so I used the other parts on a second card - this time I just glued the yellow on top of the white sheet and coloured in the background with a pale blue marker. There's still enough bits left to do a purple fish with lavender lettering, but two was enough to give you the idea.
 Anyone who's read my blog knows I'm not fond of colouring. Sandy's examples are totally awesome, but I couldn't possibly do justice to Fran's designs if I tried to colour them in myself (you really don't want to see what I did to the poor fishy I tried to draw scales on by hand...) Luckily I don't have to try. I cheated! lol There's another solution that works really well for simple designs with fairly large pieces - I paper-pieced them! NOTE - paper-piecing wouldn't work well on Fran's other images because they're too detailed and you'd go barmy trying to cut and reassemble all those fiddly little bits, so I chose the fishy by default. Besides, he's CUTE!
Friday, February 11, 2011
OWH Blog Skip Number One

Our challenge was simple - each participant was given a card pack with some patterned paper squares and a cute bunny stamp, and asked to make a card using these supplies and whatever else we felt like adding. There were two bunnies in the pack (one to practice on) but I don't do a lot of colouring, so I was able to use both. In other words, you get two cards for the price of one! (note - my scanner has a peculiar quirk - everything I scan comes out MUCH more contrasty than it is IRL. That is not blue ink around the edges of the shield, it's violet almost the same shade as the ribbon!)


And there's my two-for-one special. Are you inspired by these cards? Want to share some of your own? We hope so! There will be more blog skips through the year, so many of you will get a chance to show your stuff. But why wait? OWH is hosting a full-blown bloghop in March, and signups are open now. You have until March 2 to put your name in. We'd love to see what you can do... In the meantime, enjoy the rest of the skip. Your next stop is Marianne...

Saturday, January 22, 2011
S&S Sketch Challenge #52
 Last Sunday, the OWH Stars and Stamps blog celebrated one year of sketch challenges with Sketch Challenge #52. It really doesn't seem like a whole year... but then I've hardly done any of the sketches! I just had to do this one in honour of the anniversary, so here are two cards I made today.
First, the sketch...nice and simple and good for the 'clean and simple' cards I prefer. I'm trying to work on making my cards as 'clean' as I can - since I don't like complicated designs, everything on the card needs to be perfect. Any little imperfection stands out like a sore thumb. 'Simple' is easy - perfect is something I'm still working on!

 I cut these flowers last night when I was fiddling around trying to make my flowerpot card. They were way too big for that, but the two largest ones were perfect for a card of their own, with a couple of others from my collection to finish them off.
Friday, July 9, 2010
Stars and Stamps Wednesday

The first card is a thank you card for Jo, and the other two are for OWH.


Thursday, July 1, 2010
Pure Stamping
I've been playing with my stamps this week and I've made a bunch of cards that are ONLY stamped as part of the Stamphaven Summerhaven celebration (there was a challenge to do pure stamping and one to make blue birthday cards and one to make a card about staying cool in the summer... The first trio of cards also happens to fit into the Stars and Stamps midweek challenge for this week - Something Tasty. :)


Monday, May 31, 2010
Pansy cards
These pansies are based on a tutorial that was posted to the Stars and Stamps blog this week. They're actually really easy to make - you need five punched petals and you trim two of them in half to make the smaller petals. The tutorial used a large butterfly punch and I don't have one, but I figured out how to get a similar result using a small seashell punch. My flowers are a lot smaller and fiddlier than hers (because of the size) but I love how they came out. I guess mine are violas. One nice thing about flowers - no two of them are ever exactly the same, so it adds to the verisimilitude to use different colours and slightly different petal shapes. :P You can see the tutorial here.


Sunday, May 23, 2010
Stars and Stamps Wednesday
This week's challenge is to make a card with stars on it... which fits right into my push to make some 4th July cards before the deadline! 4th July cards have to arrive at a mailer by June 1st, which means this is your very last week to get them done. If you think you'll be too late to get your cards to a mailer, don't put 'July 4th' or 'Independence Day' on them, make them general cards in red/white/blue etc and they can still be used afterwards.

 If you're still in the mood for red/white/blue cards, Operation Write Home is having a big bloghop next weekend for Memorial Day. There are approximately 130 blogs signed up and it's not too late to join in! Click here. I know what I'll be doing next weekend...


Friday, May 21, 2010
365 Cards - Still catching up
Day 80 - Keep it to yourself: Friendship (friendship card without a sentiment)
This little guy was too cute not to use. I made the background with a teardrop stamp.

Day 79 - Color Scheme

These colours just screamed 'patriotic' to me... and besides it's the last week to make July 4th cards to send to Operation Write Home... so I pulled out my patriotic stickers and made some cards. The second card also fits the Stars and Stamps midweek challenge this week - simply make a card incorporating star/s! I'll be making some more starry cards this weekend and giving them their own entry later on.

 Day 78 - Imagine this money
This challenge is not to make a card including money... but to make a card INSPIRED by money. Money is not something I've ever had much of... so I give you two simple cards - I've SAVED money on these two cards because they're both recycled from a tourist brochure. We live in the Sunshine State... but all we can do is dream of enjoying the luxuries of the rich, like the gentleman enjoying himself on the left! If the good fairies ever blessed us with wealth, we'd have a house of our own.

Day 77 - Sketchy Sunday


This little guy was too cute not to use. I made the background with a teardrop stamp.

Day 79 - Color Scheme
These colours just screamed 'patriotic' to me... and besides it's the last week to make July 4th cards to send to Operation Write Home... so I pulled out my patriotic stickers and made some cards. The second card also fits the Stars and Stamps midweek challenge this week - simply make a card incorporating star/s! I'll be making some more starry cards this weekend and giving them their own entry later on.


This challenge is not to make a card including money... but to make a card INSPIRED by money. Money is not something I've ever had much of... so I give you two simple cards - I've SAVED money on these two cards because they're both recycled from a tourist brochure. We live in the Sunshine State... but all we can do is dream of enjoying the luxuries of the rich, like the gentleman enjoying himself on the left! If the good fairies ever blessed us with wealth, we'd have a house of our own.

Day 77 - Sketchy Sunday


Thursday, May 13, 2010
Stars and Stamps Wednesday
 Stars and Stamps is having a competition this week with a prize of three gorgeous digital images courtesy of Wink Wink Ink. Just use the free teddybear to make a card and link it back to the blog.
I used the pre-coloured teddy (they also have a black-and-white version for people who are better artists than me!), and he looked like he needed some cheering up, so I made my own sentiment in Publisher. A few scraps and stickers later, and I was done. You can download the teddy bear and enter the competition here. Have fun!
On another note, I've made a new blog to host some of my travel, scenic and nature photos. I'll be posting a new photo every day, so please check it out!
http://kajikittravel.blogspot.com/
Thursday, April 29, 2010
365 Cards Days 57/58/60
I posted day 59 yesterday, so here are the other challenges...
Day 57 - Ad-inspired
 Make a card inspired by this adorable baby quilt/s... I didn't really want to make another baby card because I just made one of them yesterday, but I've got a cute turtle on my Cricut Stretch Your Imagination cartridge, so I made a romantic card with that. The little bow was on the cartridge as well, I just had to figure out what size to make it... and I cut the mini bow tie by hand.

Day 58 - Crazy Eights. Make a card with at least three multiples of eight on it .
 My card has eight colours striped on the background (there were seven colours on the printed paper and I added a strip of yellow to make eight), eight petals on the flower, and eight golden gems in the center of the flower. I didn't want to over-complicate the design with that many colours in it, so I kept the flower very simple.
Day 60 - All that Glitters. It's another glitter challenge - use three colours of glitter on your card. I can't use loose glitter for Operation Write Home, so rather than skip this challenge I've fallen back on paper with the glitter safely embedded in acrylic where it can't flake off and be a danger to anyone.
 My card was inspired by the gorgeous glittery giraffe in the 'Nana's Nursery' Baby Boy stack. It had blue glitter and creamy-coloured glitter, so I added a sheet of orangey-yellow glitter cardstock, and then to make sure I had enough glitter, I finished it with a little silver sticker flower with glitter embedded right in the foil. Isn't the giraffe sweet? This card does double duty - it also fits the Wednesday Challenge over on Stars and Stamps - do the Wild Thing... and so for that matter does my kissing turtles card above!
Speaking of Challenges, Operation Write Home is holding a 'Make Someone's Day Challenge' and they have five prizes to give away... simply send in an envelope of general purpose cards (love you, miss you, thinking of you etc.) and include two Any Hero cards with a brief note of encouragement in them. The deadline for this challenge is May 10th, so if you're interested, get hopping! There's no minimum number of cards to send... so anything over four would count. :) I'm going to Orlando for the weekend, and I've got a bunch of cards made... hopefully I'll be able to make it to the post office tomorrow.
Day 57 - Ad-inspired


Day 58 - Crazy Eights. Make a card with at least three multiples of eight on it .
 My card has eight colours striped on the background (there were seven colours on the printed paper and I added a strip of yellow to make eight), eight petals on the flower, and eight golden gems in the center of the flower. I didn't want to over-complicate the design with that many colours in it, so I kept the flower very simple.
Day 60 - All that Glitters. It's another glitter challenge - use three colours of glitter on your card. I can't use loose glitter for Operation Write Home, so rather than skip this challenge I've fallen back on paper with the glitter safely embedded in acrylic where it can't flake off and be a danger to anyone.

Speaking of Challenges, Operation Write Home is holding a 'Make Someone's Day Challenge' and they have five prizes to give away... simply send in an envelope of general purpose cards (love you, miss you, thinking of you etc.) and include two Any Hero cards with a brief note of encouragement in them. The deadline for this challenge is May 10th, so if you're interested, get hopping! There's no minimum number of cards to send... so anything over four would count. :) I'm going to Orlando for the weekend, and I've got a bunch of cards made... hopefully I'll be able to make it to the post office tomorrow.
Sunday, April 18, 2010
Catching Up again
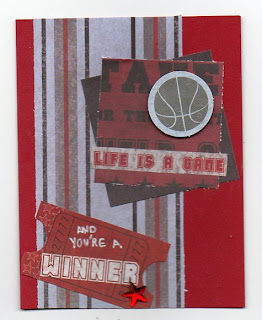
These two cards are about as far from my usual style as you can get... I picked up a couple of 'scrap packs' and paper stacks at the discount store yesterday. I tend to buy this stuff and stash it away and never actually use it, so I decided to use one of the packs for today's challenges. Teenage boys and young men need cards too, and I need to try to think outside my 'pretty-pretty' box! Everything on these two cards is from the kit except the bling.
 The first card is for S&S Sketch Challenge #12 - last weekend's Stars and Stamps sketch. I'm too late to get it into the slideshow, but not too late to post it! Here's the sketch.
And here's my take on it. I took a few liberties with the sketch because the game ticket just seemed to belong there. I need a new paper-trimmer - it tends to make ragged edges instead of nice smooth cuts and I have to trim everything down again with scissors if I want it to be neat, but for this card I think that's an advantage.
 My second card is for 365 Cards last white-space challenge, Day 48. It's been fun, but very challenging, to do all these white-space cards. I don't usually use a lot of negative space, and it's hard to think SIMPLE instead of complex! But I love the end results, so it's been a great week.
The embellishment on the base of my card came pre-made in the kit, and I kept the top part pretty simple and used some blingy stars to echo it. It still looks like it needs something on the top arrow to me, but I'm not sure what!


And here's my take on it. I took a few liberties with the sketch because the game ticket just seemed to belong there. I need a new paper-trimmer - it tends to make ragged edges instead of nice smooth cuts and I have to trim everything down again with scissors if I want it to be neat, but for this card I think that's an advantage.


The embellishment on the base of my card came pre-made in the kit, and I kept the top part pretty simple and used some blingy stars to echo it. It still looks like it needs something on the top arrow to me, but I'm not sure what!

Wednesday, April 14, 2010
365 Cards - White Space Week
his week 365 cards is posting a new 'white space' design every day. You have to follow the template and keep your embellishments and decoration in the black part of the card, leaving the rest plain and simple in some way. Here are my first three.

Day 43
My version is very simple. I used a simple pale lavender window card and mounted floral vellum in the oval, glueing a dove grey insert behind it so you can write in the card without its showing through.I stamped my sentiment straight onto one decorative strip and used a narrow ribbon for the second. Add a fabric flower with a blingy brad heart, and I was done.

 Day 44
This card combines the 365 cards challenge with Technique Tuesday from the Stars and Stamps blog.- making a recipe card. Which ironically was directly inspired by 365 Cards 'recipe card' challenge a few weeks ago and adapted for OWH. A pocket card is a good thing for OWH because the person who gets it can write a nice long letter to send home to their family. I made the sentiment in Photoshop and the rest is pretty self-evident.

Day 45
 I made a booboo when I made today's card. I completely glitched on the white space at the bottom of the card and divided mine into quarters. I'll have to have another go at it. :( But I love the cards I made so I'll post them anyway. I made two today - I took a piece of fancy printed paper the size of my card front and carefully cut it on the diagonal, using the pieces to make a pair of cards. These are also pocket cards. This card design is also doing double-duty for Stars and Stamps - today's Midweek challenge is to make a masculine and feminine version of an 'Anytime card'.


Day 43
My version is very simple. I used a simple pale lavender window card and mounted floral vellum in the oval, glueing a dove grey insert behind it so you can write in the card without its showing through.I stamped my sentiment straight onto one decorative strip and used a narrow ribbon for the second. Add a fabric flower with a blingy brad heart, and I was done.


This card combines the 365 cards challenge with Technique Tuesday from the Stars and Stamps blog.- making a recipe card. Which ironically was directly inspired by 365 Cards 'recipe card' challenge a few weeks ago and adapted for OWH. A pocket card is a good thing for OWH because the person who gets it can write a nice long letter to send home to their family. I made the sentiment in Photoshop and the rest is pretty self-evident.

Day 45
 I made a booboo when I made today's card. I completely glitched on the white space at the bottom of the card and divided mine into quarters. I'll have to have another go at it. :( But I love the cards I made so I'll post them anyway. I made two today - I took a piece of fancy printed paper the size of my card front and carefully cut it on the diagonal, using the pieces to make a pair of cards. These are also pocket cards. This card design is also doing double-duty for Stars and Stamps - today's Midweek challenge is to make a masculine and feminine version of an 'Anytime card'.
 Here is my feminine pocket card with cute little flowers... I cut up a punched vine to get leaves small enough.

And here is a more manly version.

Saturday, March 20, 2010
We wanna We wanna We wanna hop!
I'm waiting impatiently for the OWH Spring break bloghop to officially begin - it's 7am in Florida and I'm ready to start checking everyone out! But it's still the middle of the night in Washington state... I'll just pace the floor for another few hours and wait for Sandy to wake up. :)
If you're looking for my Spring Break Bloghop post, go down one entry - I posted my tutorial and a challenge last night before I went to bed so they'd be ready for you first thing this morning.
And if you want to start hopping, the first blog hop entry will be here - Stars and Stamps. At least it will once somebody wakes up to post it!
In the meantime I'm going to consider the 365 cards challenge for today - to make a noisy card. Hmmmm... shaker boxes are not really my forte, I might try to go with dangly metal charms instead.
I've been following along with 365 cards since the start of the month and I love getting a new challenge every day! It's stretching my imagination and helping to enhance my card supply so I'll have more cards to send in to OWH.
EDIT - the bloghop has been officially opened! Let's have some fun!
Friday, March 19, 2010
Let's get Hopping!

Now on to my entry-proper...
 I was scratching my head about what technique to share with you today... and I decided to share my new toy - my cropodile. I'm sure everyone knows what a cropodile does - it punches holes and mounts eyelets with the squeeze of a lever so you don't have to bang and thump and disturb the neighbours when you're making cards at midnight... they've been on the market for the best part of a decade, but I preferred brads, which don't need any kind of special tools to set. Then I saw a pink cropodile on sale and thought 'what the heck'... I was immediately impressed, not just by how easy it was to set an eyelet into my card, but by how much else I could think of to do with it.
The only snag with the hand-held cropodile is the depth of the tool is very limited - you can only poke holes near the edges of your card and not in the center or along the inside fold. Which is why they also made a larger table-top version with a full 12-inch reach (one of these days I'll have to get one of them!)
 So what to do with all of these holes? Here are just a few ideas for you...
- if you'd like to put a bow on your card, you can poke two holes close together on the card and thread the ribbon through...
- turn a punchie or a handcut cardstock shape into a homemade 'button' in moments (to make it look really flash, coat the finished button in UTEE and give it a raised, shiny finish.)
- combine one or more of the hole sizes with other small decorative punches to make a border.
- Make a corner decoration on your card with embroidery thread or wool - punch small holes and thread the yarn through. You could also make a cross-stitch border, or other threaded decoration on a strip of cardstock.
- A row of holes can become a laced decoration. Or else punch holes at either end of the card and thread the ribbon through instead of wrapping it right around the card or leaving loose ends.
- Punch a border just with holes! I used all the different-sized holes on the threaded strip so you could get an idea of how they'd work...

And now for your challenge - make a card or other paper item using your cropodile for something other than just setting eyelets! If you don't have a cropodile, use whatever size small round hole punch you do have. I'm not going to be using a ruler to measure the size of the holes. :P Make one hole, make a dozen... do whatever you like. Leave a link to your completed card in your comment, and somebody will get a prize!
I hope you'll come back and leave me a note if you attempt this challenge... in the meantime, on to the next blog in the hop - Scrappily Ever After. Lainie has a very moving story to share, and a personal challenge we all can help with.
Subscribe to:
Posts (Atom)